Next.js Quickstart: App Router
What you'll cover in this guide
- ✅ Create a client in MonoCloud
- ✅ Add the MonoCloud SDK to your Next.js project
- ✅ Add sign-in and sign-out buttons and hook them up to MonoCloud
- ✅ Create a server-side and client-side components to display user information fetched from MonoCloud
Using the Next.js Page Router instead? See the Page Router version of this guide.
Before you get started
The source code and sample for the project can be found at the following GitHub repository: App Router Sample.
Set up a client in MonoCloud
In MonoCloud, you can create different clients. Each one represents an application that you want to secure with MonoCloud. To get started, create a client configuration for the Next.js app we'll create in this guide:
- Sign up for a MonoCloud account: It's free and takes only a minute.
- Create a client: On your MonoCloud Dashboard, click Add Clients then follow the prompts to create a Web Application client.
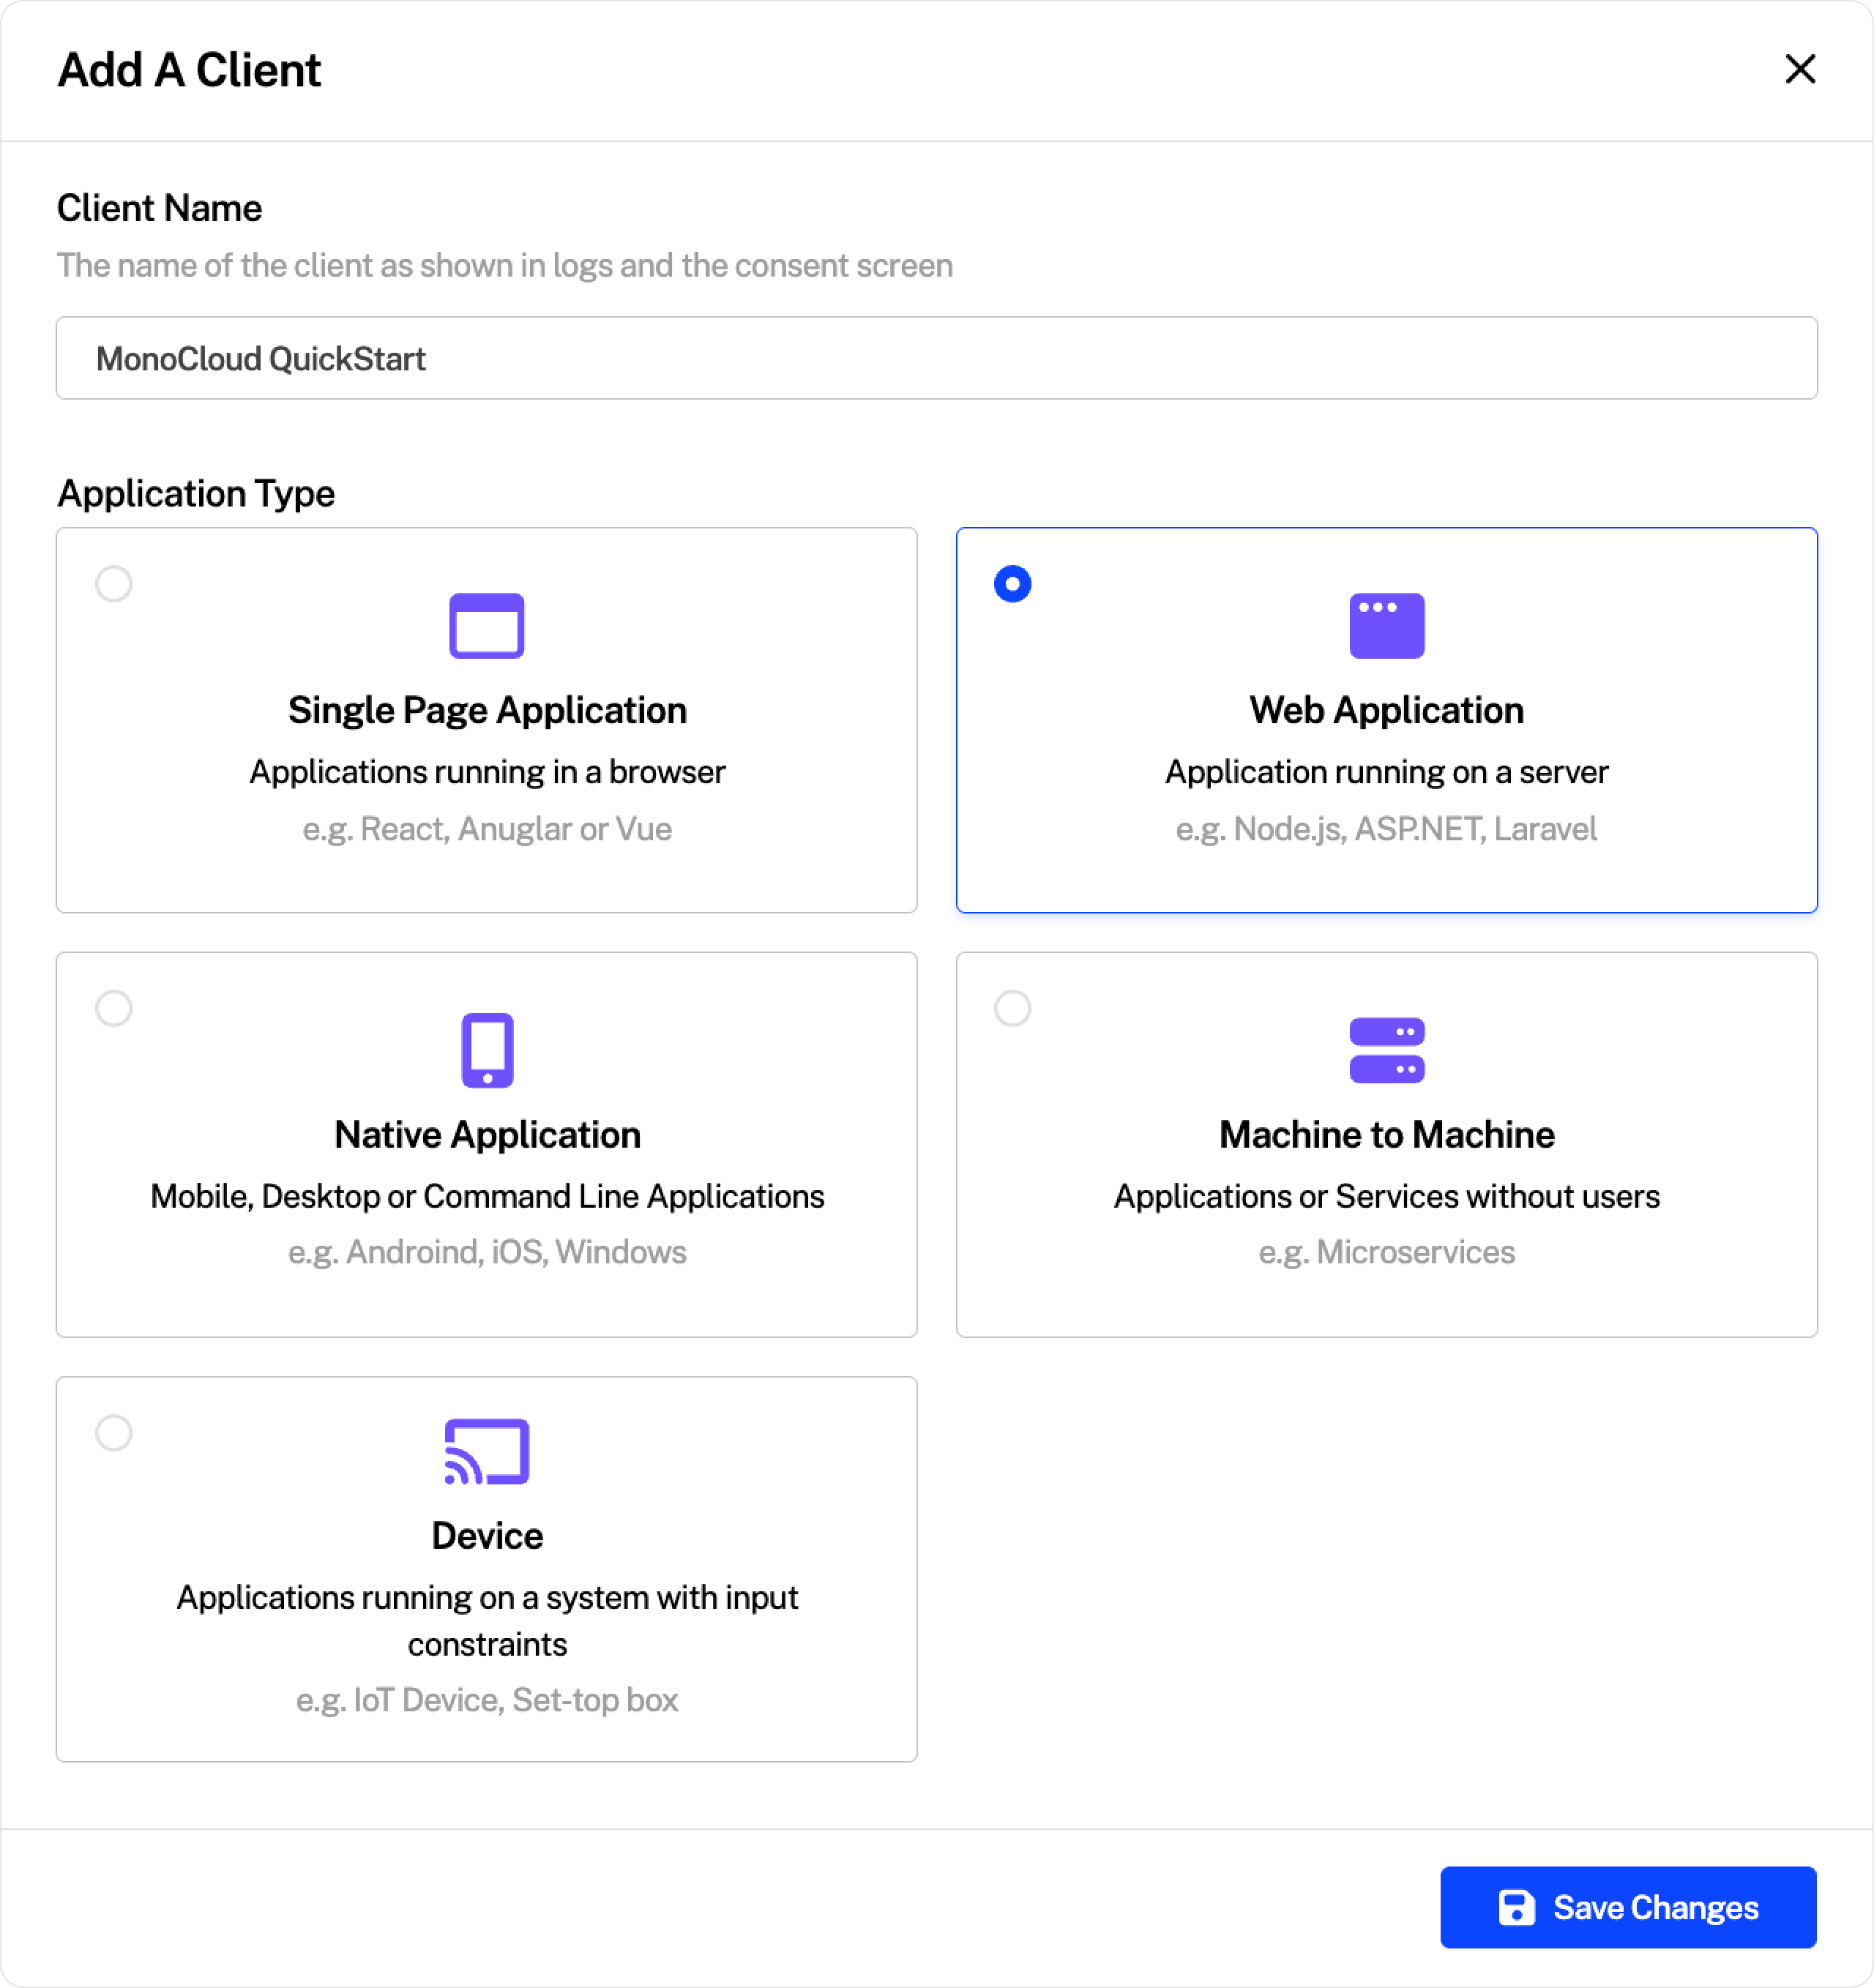
Configure your new client
On your new client's overview page, scroll down to the URLs section and add the following:
- Callback URIs: Where to redirect users after a successful sign-in.
- Sign-out URIs: Where to redirect users after they've signed out.
Set the Callback URIs to http://localhost:3000/api/auth/callback and the Sign-out URIs to http://localhost:3000.
Next, scroll to the Scopes section where you'll find two types of scope:
- Identity scopes: A collection of claims available in the id_token for use by the client.
- API scopes: The resources users can access and a collection of claims made available in the access token for the API.
Select openid, profile, and email in Identity scopes. We can leave API scopes for now.
Install the MonoCloud SDK
Create a fresh Next.js app
If you don't have one yet, set up a fresh Next.js app by running the following command in your terminal:
npx create-next-app@latest quickstart
This command will create a new Next.js application in a directory named 'quickstart'.
It will ask you some configuration questions. The ones to look out for are:
- Select Yes for Would you like to use TypeScript?
- Select Yes for Would you like to use src/ directory?
- Select Yes for Would you like to use App Router? (recommended)
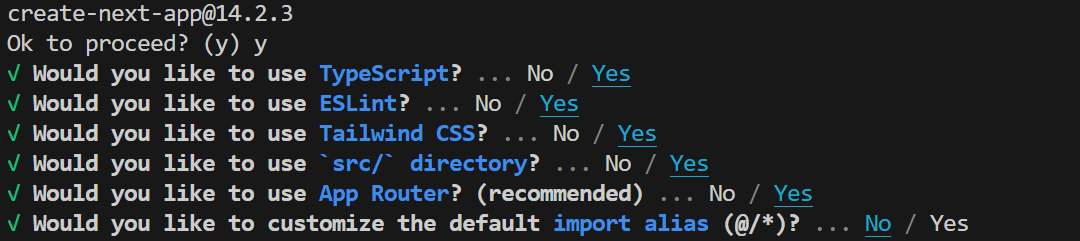
In this guide, we're working with the Next.js App Router. See the Page Router version of this guide if you prefer.
Next, install the MonoCloud SDK for Next.js. In your new project directory, run:
npm install @monocloud/nextjs-auth
Set your app's environment variables
To connect the MonoCloud SDK with your MonoCloud project, you'll need to set up some environment variables.
Create an .env.local file in your application's root directory and open your client's settings page in the MonoCloud Dashboard.
You'll find the first three values you need in the General Settings and Secrets sections on the client's setting page:
| Environment variable | Where to find the value in MonoCloud |
|---|---|
| MONOCLOUD_AUTH_ISSUER | Tenant Domain from General Settings |
| MONOCLOUD_AUTH_CLIENT_ID | Client ID also from General Settings |
| MONOCLOUD_AUTH_CLIENT_SECRET | For now, use the default secret in the Secrets section |
| MONOCLOUD_AUTH_SCOPES | Set this to openid profile email, the types of user profile data for our app |
| MONOCLOUD_AUTH_APP_URL | In dev, this will be http://localhost:3000 |
| MONOCLOUD_AUTH_COOKIE_SECRET | Generate a secret key using your preferred method or run the following command in the terminal: openssl rand -hex 32 |
Your .env.local file should look like this, with your specific values in place of the placeholders:
MONOCLOUD_AUTH_ISSUER=https://<your-domain>
MONOCLOUD_AUTH_CLIENT_ID=<your-client-id>
MONOCLOUD_AUTH_CLIENT_SECRET=<your-client-secret>
MONOCLOUD_AUTH_SCOPES=openid profile email
MONOCLOUD_AUTH_APP_URL=http://localhost:3000
MONOCLOUD_AUTH_COOKIE_SECRET=<your_secret>
Add auth to your Next.js app
Now we're ready to add authentication to the Next.js app. We'll start by creating a header component with a sign-in and sign-out button.
- Start by creating a
componentsfolder undersrc. - In the
componentsfolder, create aheader.tsxfile. - In your editor, create a new header component by adding the following TypeScript code to the new file:
import { getSession } from "@monocloud/nextjs-auth";
import { SignIn, SignOut, SignUp } from "@monocloud/nextjs-auth/components";
import Link from "next/link";

export default async function Header() {
  const session = await getSession();

  return (
    <nav className='flex bg-slate-900 p-4 justify-between text-white'>
      {session?.user ? (
        <h1>Hello {session?.user?.email}</h1>
      ) : (
        <div>Welcome</div>
      )}

      <div className='flex gap-4'>
        <Link href='/'>Home</Link>
        {session?.user ? (
          <>
            <Link href={"/server"}>Server Page</Link>
            <Link href={"/client"}>Client Page</Link>
            <SignOut>Sign Out</SignOut>
          </>
        ) : (
          <>
            <SignIn>Sign In</SignIn>
            <SignUp>Sign Up</SignUp>
          </>
        )}
      </div>
    </nav>
  );
}
Let's walk through the component briefly:
- We import the MonoCloud SDK, along with SignIn, SignOut, and SignUp button components.
- We create a Header component that shows a sign-in button if the user isn't signed in, and a sign-out button if they are.
- Clicking the sign-in button redirects the user to the MonoCloud login.
For now, don't worry about the /server and /client links as we'll set them up later.
Add MonoCloud as the auth provider
Now that we have a header, we need to render it and manage authentication state.
On the client-side, we'll do that using the MonoCloudAuthProvider component from the MonoCloud SDK. This component takes care of:
- Keeping the session updated and synchronized between different tabs and windows.
- Sharing the session object across components using React Context, but only for client-rendered components.
In the app folder of your Next.js project you'll find layout.tsx. Open the file in your editor and replace the contents with the following code:
import type { Metadata } from "next";
import { Inter } from "next/font/google";
import "./globals.css";
import Header from "@/components/header";
import { MonoCloudAuthProvider } from "@monocloud/nextjs-auth/client";

const inter = Inter({ subsets: ["latin"] });

export const metadata: Metadata = {
  title: "Create Next App",
  description: "Generated by create next app",
};

export default function RootLayout({
  children,
}: Readonly<{
  children: React.ReactNode;
}>) {
  return (
    <html lang="en">
      <MonoCloudAuthProvider>
        <body className={inter.className}>
          <Header />
          {children}
        </body>
      </MonoCloudAuthProvider>
    </html>
  );
}
Here, we're importing the MonoCloudAuthProvider component and using it to wrap the page contents. This allows us to share the session object across components using React Context.
Configure the authentication handler
Next we'll set up the handler that will interact with MonoCloud on the server-side of your Next.js app.
We'll start by creating three folders in the src/app/ directory.
- Inside your project's
src/app/directory create a new folder namedapi. - Inside
api, create a folder namedauth. - Inside
auth, create a new folder named[...monocloud].
The last of these folders is a catch-all route that will handle all the authentication requests from MonoCloud.
Inside the new [...monocloud] directory, create a route.ts file and add the code below:
import { monoCloudAuth } from "@monocloud/nextjs-auth";

export const GET = monoCloudAuth();
monoCloudAuth() adds the core authentication functionality, including:
- signin: Handles sign-in requests from the browser.
- signout: Handles sign-out requests from the browser.
- userinfo: Fetches profile data for the currently signed-in user.
- callback: Processes the callback from MonoCloud after authentication and sets up the session.
Create the pages we need
Let's recap where we are so far:
- We've set up a header with sign-in and sign-out buttons.
- We've added the
MonoCloudAuthProviderto our layout to manage authentication state and make available the user's session in client-rendered components. - We've created a catch-all route handler to manage authentication requests.
Now we need to set up the server and client components that will display the user's session and profile data.
As we saw in the header component, we have two links: Server Page and Client Page. Let's create two pages, one with a server-side component and another with a client-side component. We'll use getSession() and useUser() from the MonoCloud SDK to display the current session details and some information about the user.
Create the server rendered page
In this quickstart, we're not protecting any particular pages or endpoints. Instead, we're logging a user in and then displaying their session and user information.
In a real application, protect individual pages usingprotectPage()or protect several pages and endpoints usingmonoCloudMiddleware().
- Inside your project's
src/appfolder create a new folder namedserver. - Inside that folder, create a new file called
page.tsxand add the code below:
import { getSession } from '@monocloud/nextjs-auth';

export default async function ServerComponent() {
  const session = await getSession();

  if (!session?.user) return <div>Please Sign In...</div>;

  return (
    <div className='mt-5 ml-5'>
      <p>Hi {session.user.email} from the Server</p>
      <h1>Session:</h1>
      <div className='pl-2 flex flex-col gap-2'>
        <textarea
          className='text-black w-3/5 p-2 rounded-md text-sm'
          cols={30}
          rows={10}
          value={JSON.stringify(session, undefined, 2)}
          readOnly={true}
        />
      </div>
    </div>
  );
}
Now we have a server-rendered page that uses getSession() from @monocloud/nextjs-auth to:
- Fetch the current session and display some user information (if the user is signed-in)
- Otherwise, invite the user to sign-in
Create the client rendered page
Protecting client-rendered pages is very similar to what we just did with our server-rendered page.
Just as with server-rendered pages, in a real application you'd protect individual pages by usingprotectPage()or protecting several pages and endpoints withmonoCloudMiddleware()from@monocloud/nextjs-auth.
- Inside your project's
src/appfolder, create a new folder namedclient. - Inside that new
clientfolder, create a file calledpage.tsxand add the code below:
'use client';

import { useUser } from '@monocloud/nextjs-auth/client';

export default function ClientComponent() {
  const { user, isAuthenticated, isLoading } = useUser();

  if (isLoading) return <div>Loading...</div>;
  if (!user) return <div>Something went wrong!</div>;
  if (!isAuthenticated) return <div>Please Sign In...</div>;

  return (
    <div className='mt-5 ml-5'>
      <p>Hi {user.email} from the Client</p>
      <h1>User:</h1>
      <div className='pl-2 flex flex-col gap-2'>
        <textarea
          className='text-black w-3/5 p-2 rounded-md text-sm'
          cols={30}
          rows={10}
          value={JSON.stringify(user, undefined, 2)}
          readOnly={true}
        />
      </div>
    </div>
  );
}
The result is similar to what we did with the server-rendered page. If the user is logged in, we retrieve their user profile information using the useUser() hook from the MonoCloud SDK and display it. If not, we invite them to sign-in.
Now let's see it in action
You can now run your application by executing the following in your terminal:
npm run dev
To see your MonoCloud protected Next.js application action, visit: http://localhost:3000
Try it out by clicking the Sign in button in the header. That will take you through the log-in flow using MonoCloud. Once you're signed in, visit the server-rendered page by clicking the Server Page link in the header and then the client-rendered page by clicking the Client Page link.
Now jump back to the MonoCloud Dashboard and check out the Users section to see yourself in the users list.
Finally, back in your Next.js app, click Sign Out in the header to see the sign-out flow in action.
Great work! You've just secured a Next.js application using MonoCloud.
Next steps: Learn how to protect client rendered pages.